You need to choose options for product.
-
 products/87667762.jpg
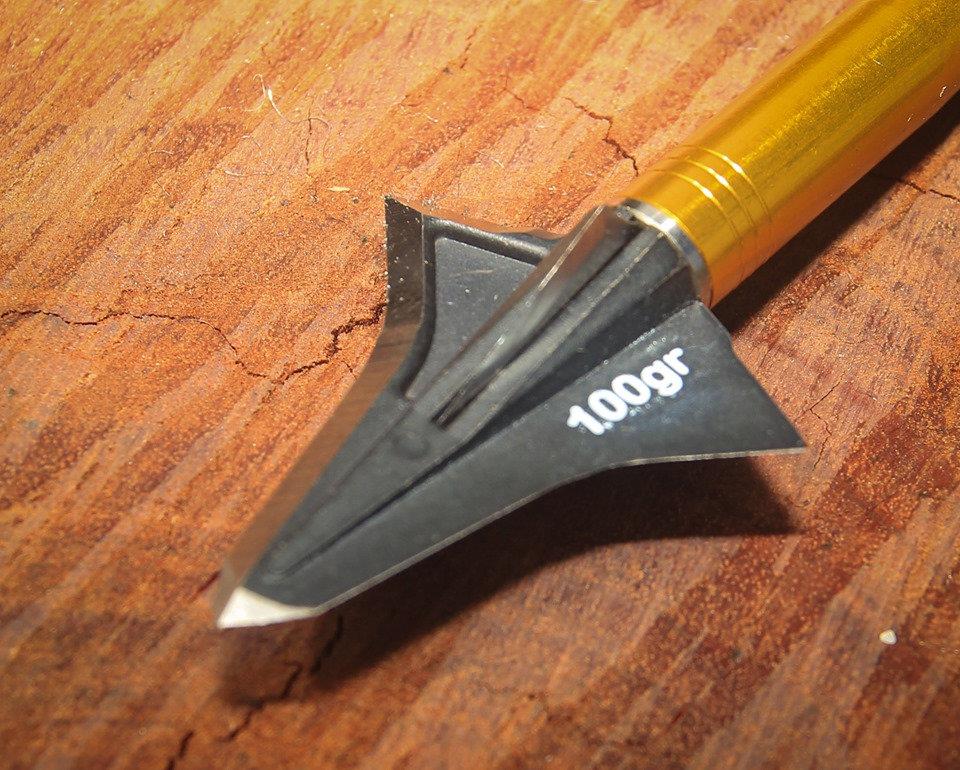
Pilot Cut Gen2 – a new type of 2-blade or 4-blade interchangeable broadhead Assembly Instructions – 6 easy steps – Infill or Bleeder Blade
1. Select either Infill or Bleeder Blade (Note: if choosing Bleeder Blade please use a small pair of pliers to prevent injury.) 2. Apply a small amount of string wax on the thread and shank of the broadhead (This helps with seating the Infill/Bleeder Blade & helps tighten the washer.)
3. Install the front of the Infill/Bleeder Blade into the slot ensuring you keep it centred. (The front is identified by the small round hole.)
4. Push the back of the Infill/Bleeder Blade in until the rear locating tabs are flush with the shank of the broadhead.
5. Install washer over thread onto the shank of the broadhead, securing the locating tabs. (Take care as there are multiple cutting edges. Please use broadhead wrench to prevent injury and to ensure maximum tightness.)
6. Screw into your arrow Please check out our YouTube Channel for our instructional video.
​
*Note: The Bleeder Blade adds 5-10 grains of weight to the Broadhead system
*Please make sure to tune your broadheads and bow prior to going out hunting
​
Aerodynamic design
Full stainless steel construction
3:1 Ratio at front
Solid one piece
Single bevel.
True 46-48 Rockwell Hardness
One of the biggest benefits and something we have been working on for a while now and is the name behind the product. it’s the approach angle of the initial blades with a 3: 1 ratio giving you optimal penetration and prevents the arrow from glancing or sliding along the ribs on those tight angling shots where pin point accuracy is required and the arrows route needs to remain on track to get in and destroy those vitals. Adding to the previous benefits of the single bevel it again comes into its own as the design makes the head essential drill its way into the vitals creating a wound channel that is both helical and accurate. Having this design also promotes wider wound channels as the head penetrates it pulls the flesh in and slices it meaning the wound channel could be up to 10mm wider than the actual head. So what does this mean for you?
This means:
wider wound channels
bigger blood trails
quieter arrows
more accurate arrow flight
more money in your pocket to spend on hunting.
​
Anyone who has tried to drill a 30 mm hole through a plate of steel knows you have to pilot the hole first, so when that big boar is tucked up and your arrow needs to hit its mark and continue on that path what do you do ?
You make sure you have a pilot cut head on the danger end of your arrow, with a 3:1 ratio single bevel, tanto tip leading to a flared out cutting blade that is 30mm wide to ensure a big nasty hole and an easy tracking job.
Kayuga Pilot Cut GEN 2 6 pack
- Regular price
- $119.00
Pilot Cut Gen2 – a new type of 2-blade or 4-blade interchangeable broadhead Assembly Instructions – 6 easy steps – Infill or Bleeder Blade
1. Select either Infill or Bleeder Blade (Note: if choosing Bleeder Blade please use a small pair of pliers to prevent injury.) 2. Apply a small amount of string wax on the thread and shank of the broadhead (This helps with seating the Infill/Bleeder Blade & helps tighten the washer.)
3. Install the front of the Infill/Bleeder Blade into the slot ensuring you keep it centred. (The front is identified by the small round hole.)
4. Push the back of the Infill/Bleeder Blade in until the rear locating tabs are flush with the shank of the broadhead.
5. Install washer over thread onto the shank of the broadhead, securing the locating tabs. (Take care as there are multiple cutting edges. Please use broadhead wrench to prevent injury and to ensure maximum tightness.)
6. Screw into your arrow Please check out our YouTube Channel for our instructional video.
​
*Note: The Bleeder Blade adds 5-10 grains of weight to the Broadhead system
*Please make sure to tune your broadheads and bow prior to going out hunting
​
Aerodynamic design
Full stainless steel construction
3:1 Ratio at front
Solid one piece
Single bevel.
True 46-48 Rockwell Hardness
One of the biggest benefits and something we have been working on for a while now and is the name behind the product. it’s the approach angle of the initial blades with a 3: 1 ratio giving you optimal penetration and prevents the arrow from glancing or sliding along the ribs on those tight angling shots where pin point accuracy is required and the arrows route needs to remain on track to get in and destroy those vitals. Adding to the previous benefits of the single bevel it again comes into its own as the design makes the head essential drill its way into the vitals creating a wound channel that is both helical and accurate. Having this design also promotes wider wound channels as the head penetrates it pulls the flesh in and slices it meaning the wound channel could be up to 10mm wider than the actual head. So what does this mean for you?
This means:
wider wound channels
bigger blood trails
quieter arrows
more accurate arrow flight
more money in your pocket to spend on hunting.
​
Anyone who has tried to drill a 30 mm hole through a plate of steel knows you have to pilot the hole first, so when that big boar is tucked up and your arrow needs to hit its mark and continue on that path what do you do ?
You make sure you have a pilot cut head on the danger end of your arrow, with a 3:1 ratio single bevel, tanto tip leading to a flared out cutting blade that is 30mm wide to ensure a big nasty hole and an easy tracking job.
- Regular price
- $119.00

Customers also bought
Product Description
Pilot Cut Gen2 – a new type of 2-blade or 4-blade interchangeable broadhead Assembly Instructions – 6 easy steps – Infill or Bleeder Blade
1. Select either Infill or Bleeder Blade (Note: if choosing Bleeder Blade please use a small pair of pliers to prevent injury.) 2. Apply a small amount of string wax on the thread and shank of the broadhead (This helps with seating the Infill/Bleeder Blade & helps tighten the washer.)
3. Install the front of the Infill/Bleeder Blade into the slot ensuring you keep it centred. (The front is identified by the small round hole.)
4. Push the back of the Infill/Bleeder Blade in until the rear locating tabs are flush with the shank of the broadhead.
5. Install washer over thread onto the shank of the broadhead, securing the locating tabs. (Take care as there are multiple cutting edges. Please use broadhead wrench to prevent injury and to ensure maximum tightness.)
6. Screw into your arrow Please check out our YouTube Channel for our instructional video.
​
*Note: The Bleeder Blade adds 5-10 grains of weight to the Broadhead system
*Please make sure to tune your broadheads and bow prior to going out hunting
​
Aerodynamic design
Full stainless steel construction
3:1 Ratio at front
Solid one piece
Single bevel.
True 46-48 Rockwell Hardness
One of the biggest benefits and something we have been working on for a while now and is the name behind the product. it’s the approach angle of the initial blades with a 3: 1 ratio giving you optimal penetration and prevents the arrow from glancing or sliding along the ribs on those tight angling shots where pin point accuracy is required and the arrows route needs to remain on track to get in and destroy those vitals. Adding to the previous benefits of the single bevel it again comes into its own as the design makes the head essential drill its way into the vitals creating a wound channel that is both helical and accurate. Having this design also promotes wider wound channels as the head penetrates it pulls the flesh in and slices it meaning the wound channel could be up to 10mm wider than the actual head. So what does this mean for you?
This means:
wider wound channels
bigger blood trails
quieter arrows
more accurate arrow flight
more money in your pocket to spend on hunting.
​
Anyone who has tried to drill a 30 mm hole through a plate of steel knows you have to pilot the hole first, so when that big boar is tucked up and your arrow needs to hit its mark and continue on that path what do you do ?
You make sure you have a pilot cut head on the danger end of your arrow, with a 3:1 ratio single bevel, tanto tip leading to a flared out cutting blade that is 30mm wide to ensure a big nasty hole and an easy tracking job.

